
I was an intern in Ideyatech for almost 4 months. I started in the middle of April until the end of July. I was assigned to help my supervisor in making an application for a client. He was very open to any questions that I have since I came from a long break where I haven’t done any recent actual coding activities. Only practices from programming tutorial websites that I can find. He divided the tasks that needed to be done for the project which made me learn many things in the world of development because in our school we were only told to make it on our own, which results in most of us just being used to brute-force algorithm.
The office setup for is normal, compared to my previous internship in Makati. The only difference is that the people here are livelier and friendlier. You can easily get close and bond with the employees even if you are a quiet type of person, the HR or your supervisor will even introduce you to everyone on your first day. There are times where the office is quiet, everyone is focused on their work, but there are also times when employees are taking a short break and talk to each other especially their teammates, which makes the vibe around more fun and not really stressful. They like to joke around each other on their short breaks, which eventually turns to everyone having a laughter.
What I learned in this internship is something I can really use in the future, especially the APIs that we used in making projects. The real-time database that I can use for storing data, storage for files that the users will upload and download depending on their needs. Along with it is an easier set up of authorization, may it be through Google, Facebook, or Twitter. You can even set up an authorization for Github if your target crowd are developers. Along with the knowledge gained in APIs, I also had a short introduction to learning Javascript for a project of mine before I end my internship. Unfortunately, I wasn’t fully able to absorb and do Javascript at an efficient rate resulting to a slow work, also probably because of lack of skills on how to develop individually and from scratch.
Towards the end of my internship, an employee organized a meet up of Quality Assurance from different companies to talk about what they do. It was a once a month meetup, but this time, it was sponsored by Ideyatech. From this meet up I also gained other knowledge not only for a developer but also in the field of testing.
To cap it all off, internship at Ideyatech is a great experience for me as I got a taste on how start-up companies or maybe how companies really work in terms of developing applications and software products for a client.
I have prepared a brief description and a short activity below on two APIs that I learned how to use and implemented in a project.
History API by Google FIT
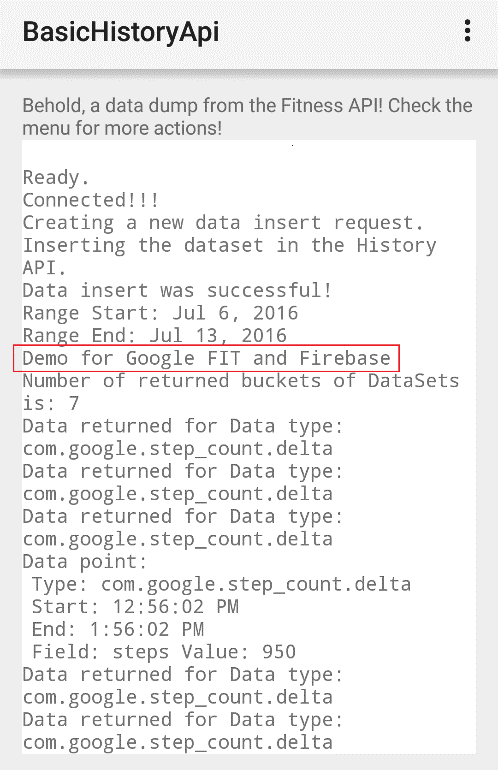
 Steps data management is the main focus of this API. It reads, imports, updates, and even let the user delete the data that is stored in it. As a requirement in this API, the application needs to log in a Gmail account for it to work. The steps taken by the user will be stored in the account that was used, so whenever that same account logs in into the application using a different device, the same number of steps will show up.
The data that will be gathered for the application will depend on the date set by the developer. It may grab data from a month ago or a few weeks ago up until the current date. Manipulation of the date entity in the application is vital as it may show inaccurate data to the user.
Real-time Database by Firebase
 The Firebase real-time database is made by importing a JSON file or manually adding data in the console. Firebase lets developers set up rules on who can read and write in the database, they can set it up that you need authorization to read or make reading open to the public if they have the route to a specific data.
Developers only need to put up different listeners in the application to listen and update the current data shown. These listeners will keep on updating the data as long as there is an internet connection to the device and the routes will not change.
User Authentication by Firebase
There are lots of options for the authentication by Firebase, you can use your Facebook account, Twitter, or even your Github account. But we won’t be using any log in sign-in methods in this demo as Google Fit and Firebase needs a different SHA-1 Key in debugging. To do this, we will be changing the rules of the database from needing authorization to public.
Application Demo Requirements
• Internet Connection
• GPS
• Android Kitkat
• Gmail Account
• Firebase Project
• Android Studio 2.x.x
• Java Development Kit 7
• GitBash
• Google Fitness API Sample – https://github.com/googlesamples/android-fit/tree/master/BasicHistoryApi
Configuring Google FIT History API
1. GET HISTORY API FROM GITHUB
• Go to your desired directory of your History API
• Open GitBash
• Clone the repository by entering ‘git clone https://github.com/googlesamples/android-fit/tree/master/BasicHistoryApi’ in the console
2. OPEN PROJECT IN ANDROID STUDIO
• From Android Studio go to File Tab
• Select Import Project
• Go to your directory where you put your History API
o By default, it is inside android-fit
• Import
3. MAKE AN OAUTH2 FOR YOUR HISTORY API
• Go to https://console.developers.google.com/
• Log in using your Gmail account
• Go to Credentials
• Create credentials. Select OAuth client ID
• You will be prompted to setup your OAuth consent screen if you haven’t
• Select Android
• Enter your client ID name, SHA-1 signing-certificate fingerprint
• Lastly, put your package name
![]()
4. TEST HISTORY API IF WORKING IN MOBILE
• Connect your Android Phone
• Press SHIFT+F10 in Android Studio
• Select your Phone
• Click Ok
Adding History API into Firebase
1. CREATE A PROJECT IN FIREBASE
• Go to https://firebase.google.com/
• Press ‘SIGN IN’ or ‘Go to console’ in the upper right-hand corner
• Create New Project
• Type in your project name and select your country.
2. ADD YOUR ANDROID PROJECT IN FIREBASE PROJECT
• Click ‘ADD APP’
• Select ‘Add Firebase to your Android app’
• Put your Android app’s package name and your debug signing certificate SHA-1
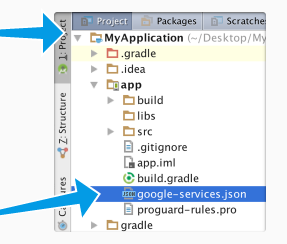
• Put the google-services.json in your project as shown in Firebase
• Put in the necessary dependencies in gradle as told by Firebase
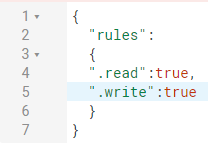
3. CHANGE THE RULES IN DATABASE IN FIREBASE
• Go to firebase console
• Navigate to ‘Database’
• Go to ‘RULES’ tabs in ‘Realtime Database’
• Change read and write into true as shown to enable reading and writing without authorization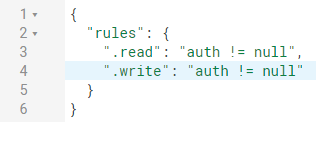
CONFIGURING THE REAL-TIME DATABASE IN THE APP
Add this dependency for the Firebase database
![]()
You might change this version and the google-play-services’ version for it to be consistent with the other services
WRITING INTO THE DATABASE
1. In this demo, we will use the function dumpDataSet, as it provides the time start and end. We will use this as our input to the database.
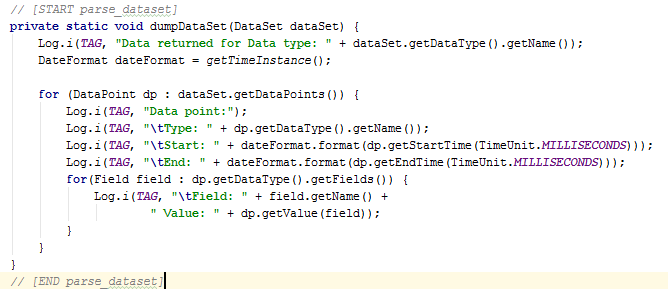
2. We will use this snippet from ‘Get Started’ made by Firebase with a little modification for us to put the time start and end for every session found by Google FIT

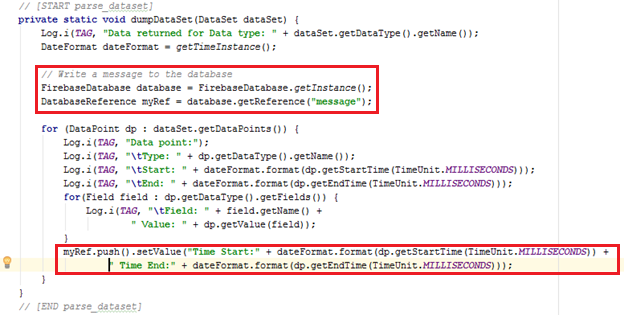
3. Run application
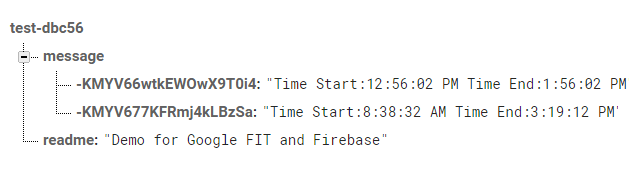
4. Double-check your Database in the console if there was a new column added named ‘message’ or other if you’ve changed the reference in the snippet.

‘push()’ puts a unique ID before posting the main value in the Database, which explains the KMXbxxxxxxxxx.
You have now successfully written in the database.
READING IN THE DATABASE
1. Make a reference to the database

2. We will make a function that will have the listener in it to read from the database. This function will be called inside DataReadRequest() before returning
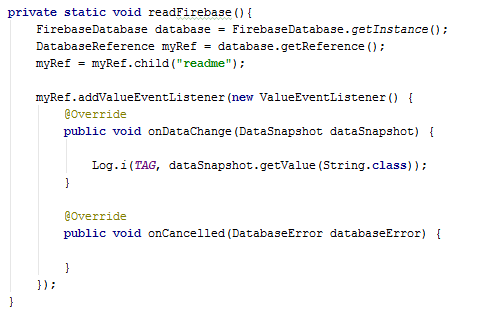
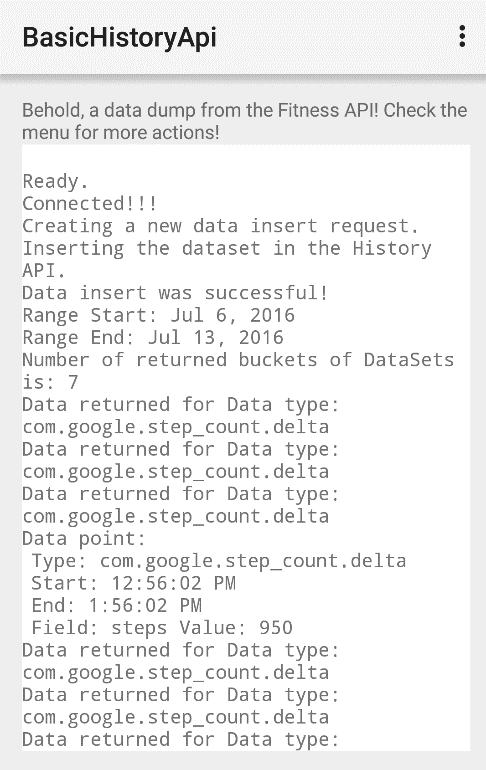
3. Run application
4. Check if your application successfully reads from your database
Before After
Author: King Irving Lindley Garcia