
State transition is a technique that has State Diagram, State-Event Matrix and Test Cases as its output. It is also one of the techniques in Black-Box Testing. It uses model of the states for the component to occupy the transitions between those states; the events which cause those transitions; and the actions which may result from those transitions.
To what kind of system does tester apply state transition testing?
- This technique can be applied on GUI (Graphic User Interface), OOS, Protocol (Communication System) and Systems without GUI (Embedded system, Middle ware).
What kind of bugs does state transition testing detect?
- Missing next state (Null Pointer Exceptions, unexpected white screens and system hangs)
- Wrong transition (Wrong order of pages)
What are the basic components of a State Diagram?
- Filed Circle – Pointing to the Initial State
- Hollow circle – Containing a smaller filled circle, indicating the final state (if any)
- Rounded Rectangle/Oblong – Denoting a State (or a certain page)
- Arrow – Denoting Transition. Most of the time there’s a text placed above these arrows. These are the actions that will make the transition happen.

For us to apply State Transition Testing, we’ll use the sample program below:
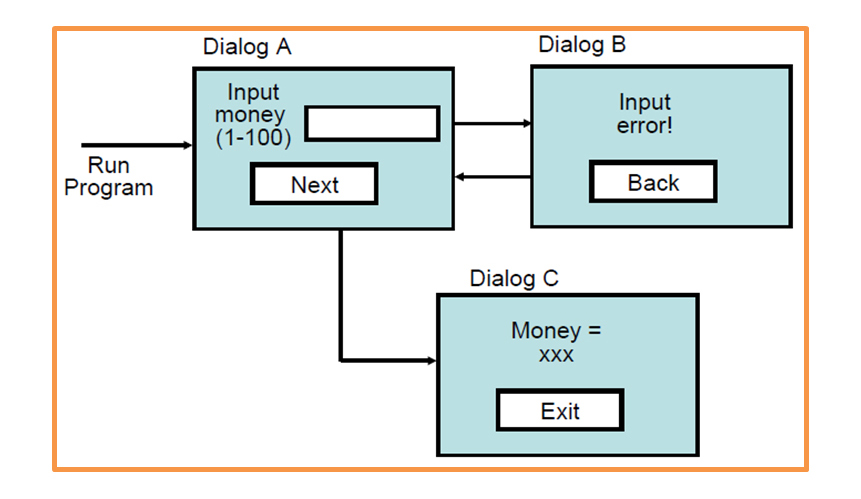
Let’s assume that a Main page was loaded before proceeding onto this process.
Now, we have here is a simple set of connected input messages.
The first page, Dialog A, will appear. The user is asked to input money ranging from 1-100. From this, two things can happen when the user clicks the Next button. One, the system will send the user to Dialog B which displays “Input error!” if he inputs invalid data such as Null, non-numeric characters, excessive dots or any failed conditions. This happens because of the user’s input. A back button is also provided on Dialog B to bring the user back to Dialog A.
Secondly, if the data inputted by the user satisfies all the conditions that were set on the program, the system will send the user to Dialog C where “Money = data inputted” will be displayed. An Exit button has been provided to send the user back to the Main page.
Knowing the basic elements of State Transition Diagram and the program’s transitions, we can now derive the State Diagram below:
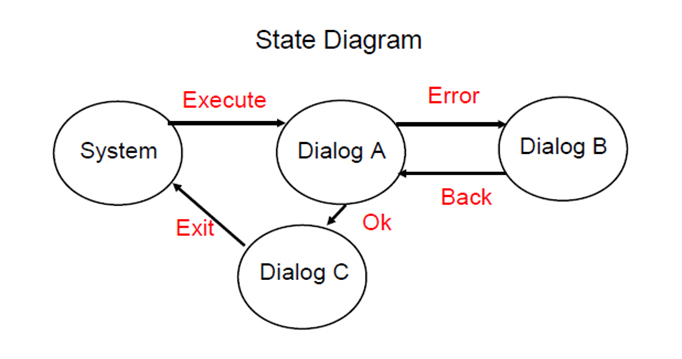
As you can see, we just illustrated the process defined above using the State Transition elements. We have four states, namely System (Main Page), Dialog A, Dialog B, and Dialog C that were connected by Arrows which have labels above them. These represent what action has been done to enable the program to switch from one state to another.
With this, we can now come up with a State table which will evaluate our program.
State Table (State – Event Matrix (Table))
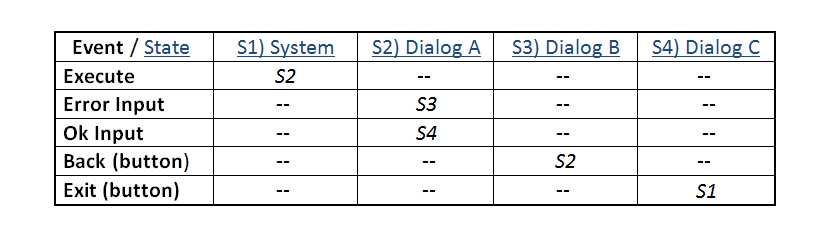
The starting point of this matrix will be at State #1 – System (Main page), and upon triggering Execute event, the program should send the user to State #2 – Dialog A.
When the user arrives at State #2, two events can happen, Error Input and Ok Input. If Error Input event has been activated, the user is sent to State # 3 – Dialog B. If Okay Input event has been activated, the user is sent to State # 4 – Dialog C.
On state # 3 – Dialog B, an error message and a Back (button) event awaits the user. Upon activating this event, the user will be forwarded to back to State #2 to input a correct data.
On state # 4 – Dialog C, the data inputted is displayed as well as an Exit (button) event. Upon triggering the Exit event, the user will be sent back to State # 1.
We have now covered all states and events on the given program above. Thus, we can map out the correct order of screen transition of our program.
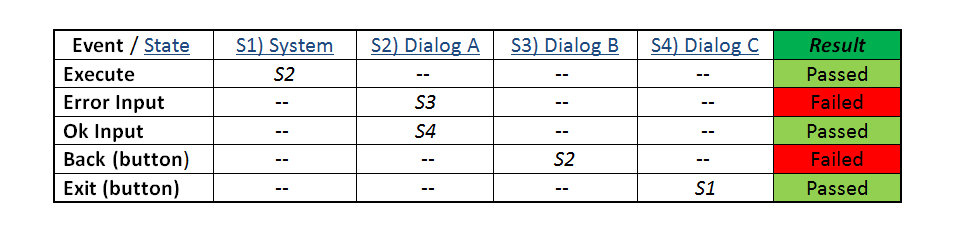
Finally, in order for us to create Test Cases that will serve our documentation (together with the State Diagram), simply add “Result” column on the right side of the State Table. This will have a possible input of “Passed” or “Failed”.
That’s all for State Transition Testing. Happy Testing!
Sources: